Showing posts with label risotto. Show all posts

Thursday, February 22, 2007

Rice Hockey

To celebrate my Chinglishness, I have brought together a Canadian sports institution, hockey, with a Chinese culinary institution, rice, to create a homage to my Chinese-Canadian heritage. I made rice pucks for dinner. That’s risotto cakes for you fancy-schmancy culinary types :p

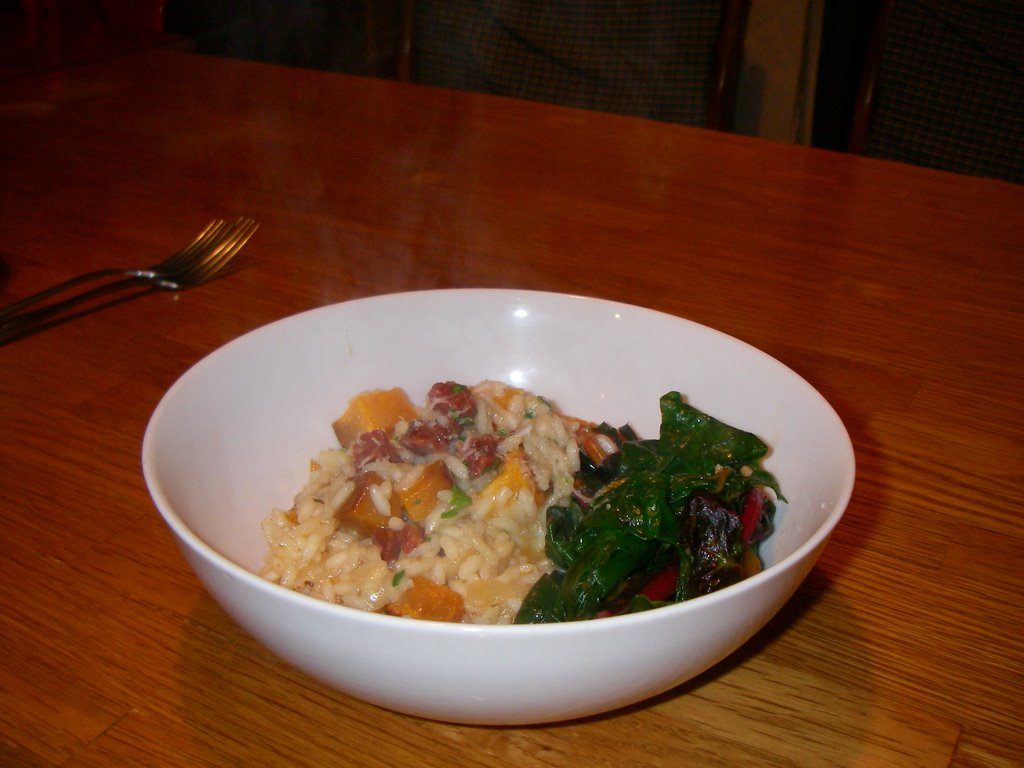
I used the risotto leftover from Tuesday night's butternut squash risotto. Leftover risotto is alright but the creaminess that defines it has degrades into ho-hum starchiness overnight . Simply nuking the stuff would leave you with splodgy rice pablum. The flavor would still be there but your teeth would get bored of having nothing to do.

Luckily, leftover risotto holds together great and adheres to stuff like panko flakes and cornmeal really well, making it a great candidate for pan-fried pucks of goodness. In fact, I try to make enough risotto for leftovers so I can make these delectable treats. You need leftover risotto, freshly made risotto is still too runny and anyways, the point of this recipe is to use up leftovers.


Here’s my Fast & Dirty Rice Puck recipe:

Cold leftover risotto

Dredging stuff – eg. Flour, cornmeal, breadcrumbs, panko flakes

Seasoning – dried herbs, spices, salt and pepper

Oil for pan frying

1- Scoop out about 1/3 cup (eyeball it) of risotto and shape into a 3/4 inch thick pucks. Wet hands makes this much easier to do. Set aside in a single layer on a plate. Repeat until all the risotto is shaped. You could make them smaller bite size pucks. Don't make them much bigger than 1/2 cup portions . It'll break apart when you try to flip them over.

2- For the dredging, mix together your dredging choice with your seasoning choice. For 8 risotto cakes, I used about ¼ cup of cornmeal with a 1/4 teaspoon of spice mix. Dredge the cakes right before cooking or else the dredging mix will get too soggy.

3- With dry hands, coat both sides of the rice pucks with the dredging mix.

4- Heat up a couple teaspoons of veggie oil over medium heat in a large frying pan. Once hot, arrange rice pucks in a single layer into the pan. Do not crowd the pan. Allow for room between the pucks. If needed, do this in 2 batches.

5- Pan fry for 3-4 minutes on each side or until you get nice golden crust.

6- Transfer done rice pucks with a slotted spatula onto a paper towel lined plate. Keep warm in a 200F oven until ready to serve.

I used a seafood spice mix that my SIL gave us for Christmas. It’s a great mix of Cajun spice with a touch of curry. We also used the spice mix on some local prawns that accompanied our meal. Nothing more than just tossing a spoonful of spice mix with some prawns and sautéing over medium high heat for a few minutes. In fact, I cooked it up in the same pan right after I cooked up the rice pucks, making this a one pan meal done in less than 15 minutes. Some fresh local mixed salad finished off our meal.

The golden crusty exterior was a perfect casing for the soft guts of this rice puck. DH couldn’t stop raving about them. He thinks I’m a culinary genius. I think that maybe we should keep the fact that it took me rubbing 2 brain cells together and 10 minutes to make our little secret. OK?


For dessert, I made dan taht, or egg tarts. Instead of using a flaky pastry dough, I used up the pie dough I had leftover from the sausage rolls I made earlier in the week. I rolled it out ¼ inch thin, cut out 4 inch rounds to line a medium sized muffin pan. I made a basic custard with local free range egg, local milk, sugar, flour and a few drops of vanilla extract. I poured the custard into the the pie crust shells and baked in a preheated 475F oven for 8 minutes. After that I turned the oven to broil for 2 minutes so the tops get all brown and caramelized. If you want, you can sprinkle a little sugar on top of the custard before broiling and get a crème brulee sort of effect. Or you could skip the broiling step altogether.

Custards are easy to make after a few initial burnt and/or curdled attempts. The key is to have everything on hand right beside the stove and be patient. Keep the heat low as you stir and wait for it to thicken. It will thicken eventually. Deny the urge to crank up the heat, you will be punished with a scorched pot and curdled custard.

I managed to squirrel a few egg tarts away for dinner tonight. We’re having some friends over for another small Chinese New Year dinner and a felting workshop. Not sure what I’m going to make for dinner but at least I have dessert covered.

Happy Eating!

Jen

Nanaimo’s 100 Mile Diet Challenge


Wednesday, February 21, 2007

Spring on the horizon

I’m feeling nearly, kinda, almost close to my old self, just in time to meet my old nemesis: Hay Fever. My daily post-work wandering about yesterday got squeezed down into a brisk 40 minute walk up and down the neighbourhood hills and by the time I got back I sounded like a trampled accordion. Yikes!

The arrival of allergies also means spring and all the yummy goodies that comes with it. I think I might have to send DH off to gather us up some young stinging nettle. The garlic in my backyard is shooting up nicely and I’m planning out what else I’m going to stick into the ground now that the Spring is starting to creep in.

But it’s not here yet. As lovely as yesterday was, the evening was chilly and there’s rumors of another cold system coming in. There may be a chance for a good climbing weekend! DH and I are probably the only ones on this island hoping for colder temperatures. We don’t voice our weather hopes too loudly for fear of being run out of town :0

Though my walk left my lungs a bit soggy, it revived the rest of me, especially my brain. I spent the rest of the day bopping from appointment to errands and putting up posters for the Nanaimo 100 Mile Diet challenge wherever I saw a bulletin board. I ended off the day with a fly-by knitting lesson. My knitting apprentice and I rendezvoused at a mall parking lot during her coffee break for a quick tutorial on the seaming and I-cords. It was the most clandestine knitting lesson I’d ever given. I was half-expecting mall security to come knocking on the window and bust us for indecent public knitting. LOL!

By the time I got home it was way past 8pm and I was starving. A look through the fridge and pantry revealed few possibilities. I had a couple cups of leftover roasted squash, roasted garlic, a few strips of smoked bacon and bunch of collard greens that were needing to get used up pronto!

I could have made a pasta but I was jonesing for stick-to-your-ribs winter comfort food. I decided on risotto. I ended up roasted garlic and butternut squash risotto topped with smoked bacon, toasted hazelnuts with spicy, garlic greens. A healthy grating of Natural Pasture’s Boerenkaas cheese topped off this satisfying dish. The only ingredient that wasn’t grown on this island was the rice. I even used smoked bacon fat to sauté some shallots and the risotto rice in. Stop clutching your heart! It was only about 2 teaspoons for bacon fat stretched over the whole dish. In fact, despite DH’s second and third helpings, I still have leftovers for tonight.


The smoked bacon fat gave the rice a deep, savoury richness. So much so that I chose not to add any cheese or butter to finish off the risotto, as you normally would for a traditional risotto. Instead I added only a grating of cheese as garnish. In a way, by using the smoked bacon fat I decreased the amount of fat normally used in this dish ;)

What a gorgeous harmony of flavors! The sweet roasted squash and garlic played nicely against the crispy, savory bacon. The garlicy, spicy greens provided a balanced counterpoint with it's pleasant green bitterness and shift in textures. The hazelnuts and cheese helped tie up all the flavors nicely. The rice, itself was creamy and comforting without being gooey and gummy. For those that think that risotto is a high-maintanence dish to make, it's not. Despite what all those cookbooks and the Food Network tells you, it doesn't need to be stirred constantly for 20 minutes. It needs regular stirring for the first 5-8 minutes. Then after that, you just need to stir it up a bit when you add in more stock. Between stirrings, I managed to wash, chop and cook up the greens, wash up the few dishes I had dirtied, shell and chop the hazelnuts, grate the cheese and clean up the kitchen. I had dinner done in under 25 minutes.

For a Fast & Dirty risotto instructions, check out my previous entry, Comfort Food and Knits.

With a happy belly, I settled into my knitting corner for some major frogging. I had managed to knit up the rest of the back of the Honeymoon sweater the night before but had made some wonky calculations on the shaping of the waist and had to redo it again. Oh well. I convinced myself I didn't really like the way the branches and leaves were shaping up in the silhouette. With new calculations and new game plan, I finished up the rest of the back panel for my sweater (for the second time). I think in total, I’ve knitted up this back panel three times. I used a mix of intarsia and cabling techniques to create the silhouette. I didn't like the chunky, pixelated look of intarsia for the limbs of the tree. I wanted nice, smooth limbs since I was trying to create an Arbutus tree effect. Instead, I used a mix of increase and decrease techniques to shape the limbs. Intarsia worked fine for the leaves. For the background, I used a mix of Noro Kureyon and Silk Garden. Mostly it was yarns leftover from past projects. Since I wanted a particular colour pattern to echo the shift from land to ocean to sunset, I seperated the yarn into colour groups and felted them in the order that I wanted. It didn't take very long and I'm thrilled how it all turned out.


I’m still not sure what I’m going to do for the front panels. I’m thinking some of a wrap sweater design. I’ve been flipping through a Japanese clothing design book from the library. I might incorporate an obi into it or maybe a haori tie to close up the front. Who knows what my wheezy little brain will think up :p

Happy Eating!

Jen

Nanaimo’s 100 Mile Diet Challenge.

Wednesday, December 13, 2006

Noodle swapping & fart bombs

One of DH’s favorite dishes is Singapore chow may, a curried rice noodle dish, and was jonesing for some on Monday night. Problem was that I didn’t have any thin rice thread. I had thick rice sticks. I had fresh udon noodles. I had dried buckwheat noodles. I had shrimp noodles. I had egg noodles. I even had an imperishable square of ichiban in my cupboards. We are a duet of noodleheads in this house. But I didn’t have any thin rice thread and I had no energy to run to the store.

So I reached for the mung beans noodles, the noodle of a thousand names. Here are some of it’s other aliases: bean threads - cellophane noodles - mung bean threads - translucent noodles - shining noodles - slippery noodles - powdered silk noodles - silver noodles - Chinese vermicelli - transparent noodles - glass noodles - crystal noodles - jelly noodles - transparent vermicelli - green bean thread noodles - invisible noodles - pekyasan - sai fun (Cantonese ) - bai fun (Cantonese) - soo hoon (Cantonese) - su un (Indonesian) - pancit sotanghon (Tagalog) - woon sen (Thai) - bun tao (Vietnamese) - tanghoon (Malaysia).

Mung bean noodles are great fun. They’re soft , almost gelatinous in texture and on their own pretty flavourless. But they absorb flavour really well and cook up in no time. Simple soak them in hot water for 10-15 minutes until their soft and transparent. They don’t need much more cooking after that.

This is basically a stir-fry dish so have everything prepped and ready to go. We had some friends pass through at dinner time so this recipe is for 4. For regular Singapore chow mai simply use thin rice threads/noodles instead of the mung bean noodles.

Fast & Dirty Singapore Chow Mai

1/2 small cabbage- shredded. You can use asian or regular cabbages

2 carrots – sliced thin

2 stalks of celery – sliced thin

1 onion – sliced thin

2 green onions- sliced thin

1 red pepper –sliced thin

2 cups mushrooms – I used fresh shitake. You can use regular white button mushrooms or a combination

2 coins of ginger – peeled and chopped fine

4 ounces BBQ pork – sliced thin

1-2 tablespoons curry powder

Chinese cooking wine

Vegetable oil

3 bundles of mung bean noodles

1- Soak noodles in hot water. Put aside. Once softened, cut with scissors.

2- Heat up a couple glugs of oil in a hot wok

3- Drop in BBQ pork, ginger and green onion.

4- Drop in vegetables in this order: onion & mushrooms, carrots, celery, pepper, cabbage. Stir fry for a minute between vegetables before adding the next.

5- Drain noodles and drop into wok. Stir until mixed.

6- Sprinkle in curry powder and mix until incorporated

It only really took about 10 minutes of playing human food processor for the prep and another 10 minutes for the actual cooking. In less than half an hour we all sat down for a simple meal and some great company.

Most of the veggies came from local sources. Call up your nearby veggie farm. Many still have winter veggies to sell you. A little birdie told me that Nanoose Edibles has Jerusalem artichokes right now.

BTW, the noodles stay soft even when they’re cold so leftovers are fine eaten straight out of the fridge. They could even be used as filling for curried version of a thai spring roll or on it’s own as a noodle salad. You could even do a raw veggie salad version of this by simply cooking only the noodles with curry and a bit of finely chopped ginger and adding to some slaw.

Yesterday, I got done with work early (before 1pm) and decided to drag DH down to the Old City Quarter to run a few errands. I fed DH but I don’t usually eat lunch until 3ish and I figured I’d wait until we got back. Of course 2 errands split and grew multiple heads and became several errands. Once we got those done, it was dark and I pretty much gave up on lunch and was fantasizing about all the things I could make for dinner. Then DH got thirsty and wanted to go for a beer run and I was too weak from hunger to protest. At the North Gate beer and wine we found Howe Sound Brewery beer from Squamish! We had lived there for a few years and much of those memories are soaked in Howe Sound Brewery beer. Feeling nostalgic, we picked up a IPA and a brown ale and a few other local treats. They come in these cool brown bottles with a seal spring stopper which can be reused for a million different things. They’re great bottles for homemade infused vinegars and oils.

Back home, with my belly rumbling harmonies to the wind’s blustery dirge, I got started on some dinner. I decided on a chorizo and corn risotto with some pan-fried brussels sprouts. I love Brussels sprouts and luckily, so does DH. I got these from a friend’s garden in exchange for some chard and kale from mine. There’s local Brussels sprouts out there to be had.

When people tell me that they hate these mini-cabbages, I tell them to blame it on their mom or the school cafeteria cook. The problem is that Brussels sprouts release sulphur compounds when overcooked. The brussels sprouts of most childhoods are grey, overboiled little fart bombs. I dodged that bullet. My mom never made Brussels sprouts and luckily, the first time I had Brussels sprouts, it was made by someone who didn’t treat vegetables like heathens during the Spanish Inquisition.

My favorite way to cook Brussels sprouts is to cut them in half and pan fry them in a glug of olive oil over med heat, cut side down. Once they are browned, pour in a glug of water and cover with a tight lid for a minute to flash steam them. Sprinkle salt, pepper and a splash of good balsamic vinegar.

For the risotto, I used a half a chorizo sausage from Quist farms, some local corn that I froze and a pile of grated Little Qualicum raclette cheese and Hilary’s St. Denis cheese.

It’s pretty much the same recipe as my previous risotto. I simply traded the butternut squash for corn and used local cheeses instead.

The savory sausage was countered by the summer sweet corn and it was all wrapped up in the cheese infused creamy rice. The Brussels sprouts were sweet and nutty with a bite of greenness. A great combination of textures and flavours. Luckily, the risotto was piping hot and so I was forced to pace myself or else I would have gobbled up the whole pan. Definitely a keeper.

The sun is actually breaking through here. The humidity is down a bit than the usual 100%. I may have a chance to make some holiday nut brittle today. Yippee!!!

Happy Eating!

Jen

Wednesday, November 15, 2006

Comfort food & knits

(Updated - Thanks Laurie for picking up that missing squash. I've revised the recipe below)

The winds are howling like wolves in heat, sneering at the sight of any umbrella that dared to bare its teeth. The rain, oh, this is the rain that epic poems are made of. This is the rain that drills holes into the ground and turns streets into rivers and reminds us Walmart plebians that waterfront property is used as rice paddies in other times and places.

It’s a shame that some of this glorious tempest didn’t come in the growing months when the farmers could have used it.

The storm is coming through strong. They’re calling for 120km winds on the west coast and up to 90 km for the rest of the island. I don’t know if it’s getting that burly here on the inside edge of the island here but it’s making short work of the backyard fence and is certainly providing a whole lot of drama. Even the ferries have been cancelled to the mainland. This brings to mind just how tenuous our reach to the mainland really is.

I’m cozied up inside, wrapped in the brilliant hug of MY NEW SWEATER!!!!


The first thing I did this morning was put on my new sweater and take it for a test run now that it’s finally dried from blocking. And not a moment too late, it’s the knitted equivalent of comfort food.

Speaking of comfort food, I made one of my favorite comfort foods last night for dinner: Risotto. Not just any risotto, I made a chorizo-butternut squash- manchego risotto. OK, the rice and the cheese weren’t from a local farms but most of the rest of the meal was. I had a ½ a chorizo sausage from Quist Farms just down the highway, some of the roasted butternut squash, onion and garlic from local farms, swiss chard and parsley from my own veggie garden and chicken stock made from local chickens. The swiss chard was sautéed in oil and crushed garlic and dressed with a few drops of pear balsamic vinegar from Auld Alliance farms on Gabriola Island.


It was so good that Kevin and I barely spoke while eating dinner except to remark about how good it was. The savory spicy sausage played against the sweet squash and the manchego cheese provided just the right amount of unami richness. It just all came together so well in the creamy risotto that I was surprised by how well it turned out. The swiss chard provided a nice break with its mild bitterness and simple greenness.

Here’s a picture of Kevin enjoy the last of his risotto. 10 seconds later he was literally licking the bowl clean. I don’t have any pictures of that because I was too busy laughing while protecting my bowl of risotto from his predatory fork.


Here’s the Fast & Dirty recipe for Chorizo-Squash-Manchego Risotto (serves 2)

1 cup Arborio rice

½ link dried chorizo - chopped

1 cup roasted butternut squash- cubed

½ small onion or 2 shallots- chopped fine

1 garlic chopped fine

1 litre chicken stock –simmering

½ cup manchego cheese –grated

1 pat of butter

handful of parsley- chopped fine

olive oil

salt & pepper

You want to have a pot of the stock simmering as you make this.

In a wide bottom pan, heat up a couple glugs of olive oil and the chorizo sausage over medium heat. Let the oils and flavour render out of the sausage a bit. Anytime you see the word 'render' you know it's going to be good eats.

Add onions and garlic. Cook for a few minutes until the onions have softened.

Add rice and stir so that the oil coats each grain. The rice will turn translucent on the outside with a white core.

Add in a ladle of hot stock into the pan.

Stir. Stir. Stir.

Keep stirring slowly until the rice absorbs most of the stock.

Repeat with another ladle of stock

And keep repeating until the rice is cooked through. This recipe will take most of the litre of stock and about 20 mins of cooking. You don’t want to overcook the rice into a gummy, pablum mess but you also don’t want crunchy risotto. I tend to cook it until there's only a residue of uncooked rice in the grain and then add a touch more stock and let it simply absorb the excess liquid.

Once it’s cooked through, drop in the butter, roasted squash, cheese and parsley.

Stir. Taste. Season.

You don’t have to stir the rice constantly for the whole 20 mins. I find that after the first couple ladlefuls of stock, I only have to stir it up once or twice and just let the rice absorb the liquid and make sure it doesn’t burn. By then the starch dust around the rice has done much its work to make a nice creamy base.

Some folks tell me that they find making risotto too time-consuming and tedious. Obviously they’ve been making sucky risotto because once you’ve had good risotto, you’ll realize that 20 minutes of your time is small price to pay for this bowl of Italian heaven. Quite frankly, during these cold, damp evenings, hanging out over a pot of steaming, savory goodness is not the worse place to be. Consider it a kitchen spa treatment as you inhale the wonderful aromas rising from your pan and you stir meditative patterns like a rake through a zen sand garden through the creamy rice.

Enjoy!

Jen